SharePoint Database server is maintained and configured in Microsoft SQL server. Therefore, the main aspect for migration of the SharePoint databases Server is reconnect the SharePoint Server with new database server. This blog shows the example of the SharePoint Server 2013. But this can be applied to other servers also.
Migrations of the SharePoint database Server includes:
1. Create new SQL server instance on new database server.
2. Backup of all the SharePoint server databases from the old database.
3. Restore all the SharePoint server databases to the new database server instance. (Recommended – Stop all the SharePoint sites during backup and restore databases and process to avoid the loss of data)
4. Configure the SharePoint Server again to change the database server configuration.
Now, let’s start with the mapping of our SharePoint Server with the new database server. For this, we follow the below steps to proceed.
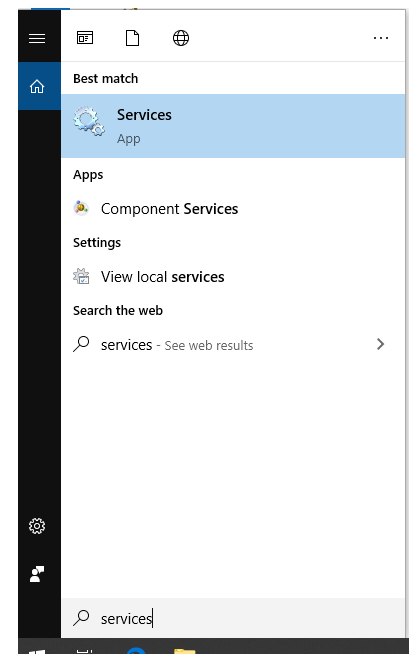
5. Open Windows Services from Start or can use the Run with “services.msc” command.


6. Stop all the SharePoint Services.
- SharePoint Administration
- SharePoint Timer
- SharePoint Tracing
- SharePoint User Code Host
- SharePoint VSS Writer
- SharePoint Foundation Search V4
- World Wide Web Publishing Service
- SharePoint Server Search 15

7. Create SQL Server alias for pointing to new SQL database server on all your SharePoint servers.
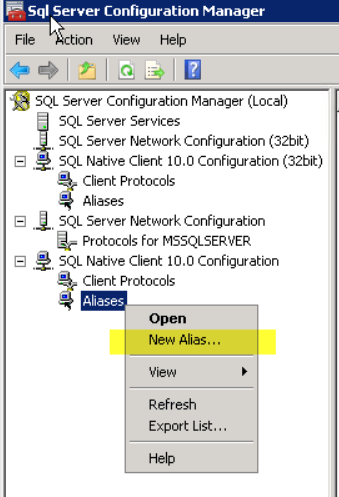
If SQL Configuration Manager is installed just head over to the SQL Native Client 10.0 configuration then into Aliases. Create a new alias that points to your new SQL Server by right clicking on the Alias. You need to do this on both 32- and 64-bit instances.

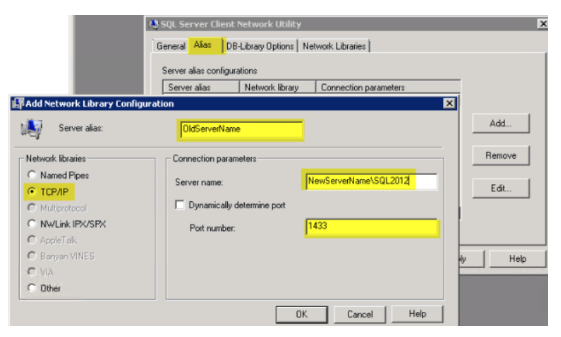
- On the Alias name put your old SQL Server IP or Name
- On the Port the port you indicated on step 7; default is 1433.
- Protocol should be TCP/IP
- And on Server the new SQL Server IP or Name together with its instance name if there is any. In our case it’s SQL2012
If you don’t have SQL Configuration Manager in your SharePoint Server then run the CLICONFIG again on both 32- and 64-bit instances. For 32-bit go to run command and execute this “%SystemRoot%/SysWow64/CliConfg.exe” and for 64-bit just this “CLICONFG” all without quotes of course. Add the same information as above.

8. Now the next step is to rename the old database server name with the new database server name in SharePoint. For this, we will use the SharePoint PowerShell command. Simply type the following command for this change.
Rename-spserver -identity “OLDSQLSERVER.DOMAIN.COM” -name “NEWSQLSERVERNAME.DOMAIN.COM”
Replace “OLDSQLSERVER.DOMAIN.COM” with your old server database name including the domain.
Replace “NEWSQLSERVERNAME.DOMAIN.COM” with your new server database name including the domain.
9. Well, now main tasks are completed, now we just have to run our services again and need to check whether all are connected perfectly or not. For this, we first now start all SharePoint Services from the Windows services.

- SharePoint Administration
- SharePoint Timer
- SharePoint Tracing
- SharePoint User Code Host
- SharePoint VSS Writer
- SharePoint Foundation Search V4
- World Wide Web Publishing Service
- SharePoint Server Search 14
10. Once all the services are up, check in the Central Administration site, whether old SQL server is renamed to the new SQL server name. Voila, its changed.
11. Now, stop all SharePoint services again like in step 6.
12. Delete SQL alias which was created in step 7.
13. Start all SharePoint services similar in step 9.
14. Finally, check whether all databases are connected to new databases. Viola, it’s all connected to the new databases and all sites are now working perfectly.
If you are looking for any Microsoft SharePoint based Solutions c-metric is your ideal partner. Contact us today and get the best solutions for your any query.
Author – Rashi Chauhan


Get in Touch